How to use DigDag Restful APIs to Trigger a Job
DigDag has been a tool of choice to run data workflows and some batch jobs at First Walkin Technologies. I liked DigDag from day one. Just like any Unix tool, It does a limited set of things but it does them quite well.
One of the things I really missed is to trigger a job remotely. Of course it has integration with S3 where it can start a job when a file appears inside a bucket. But I wanted something more, that's when I started exploring the Restful APIs of DigDag.
As of now documentation on the APIs is sparse but if you start the DigDag server with enable-swagger flag, It will expose the Swagger UI and that should make using APIs a little easy. Other than that don't expect how-tos or example runs etc
digdag-current version.jar server --memory --enable-swagger
But here, in this how-to, I am going to take you through an example Workflow/Task triggered through API call.
Table of Contents
A Simple Project and Workflow
Let us start by creating a very simple workflow. You can create a DigDag workflow by using the command
digdag init my_test_digdag
This command creates a directory called my_test_digdag and a dig file called my_test_digdag.dig with various tasks like setup, disp_current_date etc. Go ahead explore the project now. When you run they all run in sequence.
digdag run my_test_digdag
So as you see it has Project, Workflow and Tasks. A workflow is represented by a .dig file. A workflow can have one more tasks. Tasks are defined using "+". A task can have operators that start with "type>:". DigDag has range of supported Operators. In the example above we can see a echo>: operator which just prints to the console.
A set of workflows is called a Project. A project usually contains all the related workflows. If a workflow is not related to others then it's a good idea to make it a part of different project
Let's create a simple Project and Task that can be used across this how-to. I will use a simple Python script here for task. I will also use a different name for the folder and .dig file. The folder structure will look
>example_python_workflow_project [folder]
 >example_python_workflow.dig [file]
 >my_workflow.py [file]
timezone: UTC
_export:
        person: "Thejesh GN"

+run_task_1:
  py>: my_workflow.MyWorkflow.task1
#!/usr/bin/env python
import digdag

class MyWorkflow(object):
	def task1(self):
		param_person = digdag.env.params["person"]
		print "I am going to person the task for {0}".format(param_person)
So our task1(self) just reads the exported environment param from the .dig file and prints it. You can run it locally by
digdag run example_python_workflow.dig
To run it on a server. Start the server (here I am running the server on the same machine) and deploy it to the server.
#start the server
digdag server --database . --enable-swagger

#deploy the workflow project
digdag push example_python_workflow_project --project ./example_python_workflow_project --revision v1
You should be able to see the deployed workflow at http://localhost:65432
Trigger the task using API
Before we start using the APIs. Let's take a minute to know how DigDag is deployed and run. When a Project gets deployed (or uploaded), DigDag backs up the current project and deploy's the new version. The deployment command takes Project Name and Version as input.
digdag push {folder_name} --project {project} --revision {revision}
This is what you saw in the last step of the previous section. Now to run the workflow it needs a Session. A session is a context under which a workflow will run. An Attempt is an actual run/execution of a session. A sessions can be rerun if an attempt fails. In DigDag sessions are created based on TimeStamp.
With this knowledge let's start invoking the APIs. Our Goal is to make an Attemp to run a workflow. To do that we need current Workflow ID of our workflow. The workflowId changes every time you deploy a new version of code. So it's important to get the latest workFlowId. To get the WorkFlow details, you need ProjectID and hence we will start with getting Project details using Project Name.
Get Project
Request:
URL : http://localhost:65432/api/project
Query Param:
name=example_python_workflow_project

Response:
{
    "id": "3",
    "name": "example_python_workflow_project",
    "revision": "v1",
    "createdAt": "2019-10-15T05:47:59Z",
    "updatedAt": "2019-10-15T05:47:59Z",
    "deletedAt": null,
    "archiveType": "db",
    "archiveMd5": "+tY17JVIIt0/S5McYmMm/w=="
}
Here the projectId is 3 which will be used to get the Worflow in the below request.
Get Current workflowId
Request:
URL: http://localhost:65432/api/projects/3/workflow
Query Params:
Name: example_python_workflow

Response:
{
    "id": "42",
    "name": "example_python_workflow",
    "project": {
        "id": "3",
        "name": "example_python_workflow_project"
    },
    "revision": "v1",
    "timezone": "UTC",
    "config": {
        "_export": {
            "person": "Thejesh GN"
        },
        "+run_task_1": {
            "py>": "my_workflow.MyWorkflow.task1"
        }
    }
}
Make an Attempt to Run
Request:
URL: http://localhost:65432/api/attempts
Body:
{
    "workflowId": "42",
    "sessionTime": "2019-10-14T12:42:29Z",
    "params": {
    }
}

Response:
{
    "id": "11",
    "index": 1,
    "project": {
        "id": "3",
        "name": "example_python_workflow_project"
    },
    "workflow": {
        "name": "example_python_workflow",
        "id": "42"
    },
    "sessionId": "10",
    "sessionUuid": "39bd9454-d360-4e2b-a63e-58144c0f388a",
    "sessionTime": "2019-10-14T12:42:29+00:00",
    "retryAttemptName": null,
    "done": false,
    "success": false,
    "cancelRequested": false,
    "params": {},
    "createdAt": "2019-10-15T05:53:54Z",
    "finishedAt": null
}
Your digdag should print the name "Thejesh GN" as expected
Make an Attempt with Params
Lets make the request again with params. Here I am sending person="Rajesh" as the param.
Request:

{
    "workflowId": "42",
    "sessionTime": "2019-10-14T12:44:29Z",
    "params": {
        "person": "Rajesh"
    }
}
But the digdag out still prints "Thejesh GN", that's because the exported environment variable inside the .dig file takes the precedence. So to use the params passed as part of API request remove the _export part or use a different param name. Deploy it again with v2 as the version.
#!/usr/bin/env python
import digdag

class MyWorkflow(object):
	def task1(self):
		param_person = digdag.env.params["person"]
		print "I am going to person the task for {0}".format(param_person)
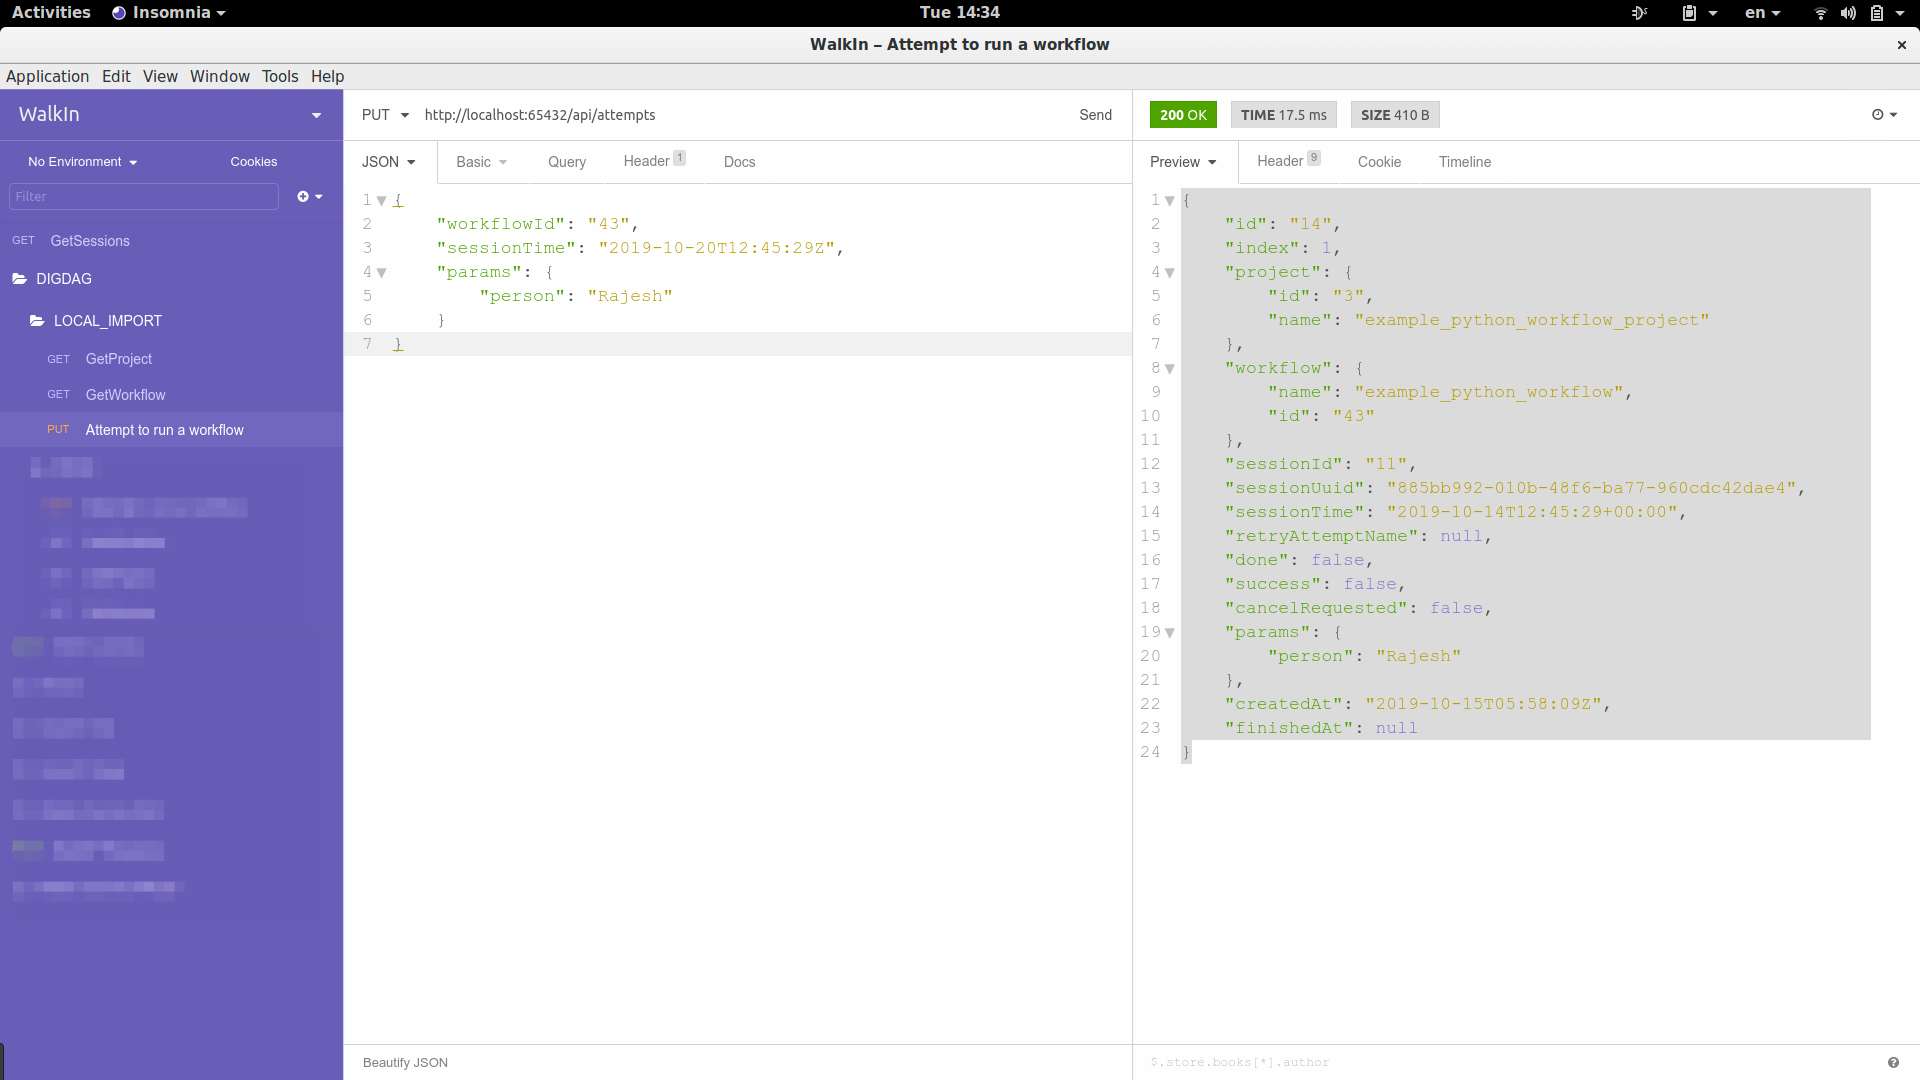
Make an Attempt, Do make sure get the new workFlowId first and change the SessionTime so it starts a new session.
Request:
{
	"workflowId": "43",
	"sessionTime": "2019-10-20T12:45:29Z",
	"params": {
		"person": "Rajesh"
	}
}

Response:
{
	"id": "14",
	"index": 1,
	"project": {
		"id": "3",
		"name": "example_python_workflow_project"
	},
	"workflow": {
		"name": "example_python_workflow",
		"id": "43"
	},
	"sessionId": "11",
	"sessionUuid": "885bb992-010b-48f6-ba77-960cdc42dae4",
	"sessionTime": "2019-10-14T12:45:29+00:00",
	"retryAttemptName": null,
	"done": false,
	"success": false,
	"cancelRequested": false,
	"params": {
		"person": "Rajesh"
	},
	"createdAt": "2019-10-15T05:58:09Z",
	"finishedAt": null
}
Now you should get the correct result. With that you have triggered a workflow with params remotely using APIs. That ends this how-to. Happy remote triggering.


1 Response
[…] a set of Restful APIs. You can control the aspects of DigDag using it. I have written a fairly long blog post about using the DigDag APIs. For a quick start, pass –enable-swagger flag to DigDag server. This will expose the Swagger […]