Table of Contents
This notebook is work in progress
Why and What
Isn't it important to answer why question every time you want to write a how-to? :)
While exploring ESP8266, I couldn't find an easy to follow guide. Also I wanted a place to record all my learning as I explored. So this page is my lab notebook. I have tried to keep the language as simple as possible so most curious minds can understand. Simple language also helps me understand and connect easily when I come back later.
What this is not?
This is not a guide which covers all possibilities. This is a notebook where I have jotted down what I explored. So there is obviously very limited set of things explained. But since this is a record of what I followed, I know it works.
At the end I have added a section called Explore, for all those things that didn't find a place in this notebook.
Why ESP8266
The ESP8266 is a micro-controller from Chinese company Espressif that comes with built in Wi-Fi capability. ESP8266 has enough on board processing and storage capacity which makes it a self-contained IoT board. It costs anywhere in between ₹200 and ₹300.
Specifications
Specifications as per manufacturer
- 802.11 b/g/n
- WiFi Direct (P2P), soft-AP
- Integrated TCP/IP protocol stack
- Integrated TR switch, balun, LNA, power amplifier and matching network
- Integrated PLLs, regulators, DCXO and power management units
- +19.5dBm output power in 802.11b mode
- Power down leakage current of <10uA
- Integrated low power 32-bit CPU could be used as application processor
- SDIO 1.1/2.0, SPI, UART
- STBC, 1×1 MIMO, 2×1 MIMO
- A-MPDU & A-MSDU aggregation & 0.4ms guard interval
- Wake up and transmit packets in < 2ms
- Standby power consumption of < 1.0mW (DTIM3)
Modes of operation
ESP8266 has two important modes of operation. Programming mode and Boot from flash mode. Its put into a mode by powering-up GPIO pin levels, GPIO15, GPIO0, GPIO2 (MTDO is equivalent to GPIO15).
| GPIO15 | GPIO0 | GPIO2 | Mode |
| L | L | H | Download code from UART (Programming) |
| L | H | H | Boot from SPI Flash (Normal) |
| H | x | x | Boot from SD-card |
Programming mode
In this mode you can transfer the program from your PC to ESP8266 using serial communication. To put the ESP8266 into this mode we need to power-up the pins in a particular way.
- GPIO 15: LOW
- GPIO 0: LOW
- GPIO 2: HIGH
This puts the ESP8266 in UART mode. Since all the computers now have a USB port we can just buy a cheap USB-to-UART adapter. Then wire it up so we can program the ESP8266 the way we want. Check the circuit below where the we have put ESP8266 in UART mode and also connected it to a SB-to-UART adapter.
Boot and Run mode
We generally boot from built in Flash. You can power up the pins like below to boot up from Flash.
- GPIO 15: LOW
- GPIO 0: HIGH
- GPIO 2: HIGH
What to buy
Option 1: Plain ESP8266
ESP8266 Module
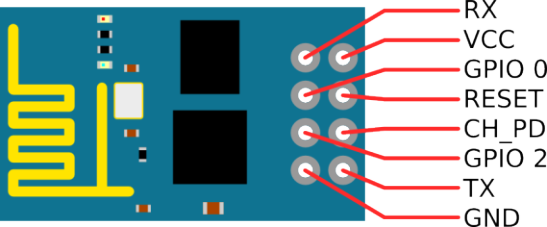
ESP8266 comes assembled on a board. Most famous ones are called ESP-XX boards. ESP-01 is easily available. You cant use it directly on a breadboard but can be connected using Dupont wires. ESP-01 has eight pins RX/TX for communication, 4 control pins - GPIO0, GPIO2, CH_PD and ReSeT. VCC and GND for the power.
CP2102 based USB to UART
The CP2102 USB to UART Bridge is required for programming the ESP8266 from a computer.
3.3V power supply
ESP8266 is powered by 3.3 volts and not 5 volts. So make sure to use 3.5 volt setting in your power supply. It draws maximum current of 300 mA, You can also use two AA batteries to power it if you don't want to invest in power supply or build a power supply circuit. I generally use two AA batteries in all my experiments.
Option 2: Developer Kit
Developer Kit
If you don't want to be worried about setting up the circuit for writing and want concentrate mostly on the development of the software then NodeMCU Developer Kit is the best. Its all in one ESP8266, Programmer and power. It can be powered using a simple USB cable. It works both with MicroPython firmware and NodeMCU firmware.
USB to MicroUSB Cable
A simple usb cable. The same cable is used for both powering and programming. When I am done with programming and just want to power, I will use regular micro-usb mobile phone charger.
I use Option 1 - In production environment and I use Option 2 -for day to day development work.Tools
Below are some minimum tools that you need to install on your desktop so you can
esptool.py
esptool.py is a cute Python utility to communicate with the ROM bootloader in Espressif ESP8266. Its supposed to work on all desktop platforms, though I have tried only on Linux.To install simply download download the zipped code from GitHub or clone if you are a developer. Extract and cd into the folder. Then run help to get more info.
#step1 install pyserial - only dependency
sudo pip install pySerial

#step2 install and try esptool.py help
pip install esptool
python esptool -h
ESPlorer
ESPlorer is a free and open source Integrated Development Environment (IDE) for ESP8266 developers. It needs Java 7. It works on all major desktop operating systems. I used it on Ubuntu with OpenJDK7. ITs the most useful tool that you will use on day today basis.
Just download the zipped file and run using bat file or in command line go to the folder
java -jar esplorer.jar
WebREPL Client
WebREPL client and related tools, for accessing a MicroPython REPL. It also includes webrepl_cli.py which can be used through command line. Its also useful to transfer files to ESP8266.
To run WebREPL client, download the archive and extract it. Cd to the folder.
python -m SimpleHTTPServer 9090 .
Once you run the command. Go to the browser and access. http://localhost:9090/webrepl.html.
If you want to use CLI, then try, it will show all the options availabe.
webrepl_cli.py --help
Firmware and SDK
NodeMCU/Lua
NodeMCU - An open-source firmware and development kit that helps you to prototype your IOT product within a few Lua script lines.
NodeMCU is a Lua based firmware. NodeMCU has both firmware and SDK built into it. You can download the latest version of the firmware from GitHub, it generally has the file extension .bin. If you are in the mood of customization then go to NodeMCU custom builds, select the modules you want in your firmware and build one for yourself. Final downloaded firmware will have .bin extension.
I don't use NodeMCU/Lua firmware anymore. Corresponding section has been moved to a separate child page - NodeMCU Setup on ESP8266, mostly for archival purpose.
MicroPython
Micro Python is a lean and fast implementation of the Python 3 programming language that is optimised to run on a microcontroller. The Micro Python board is a small electronic circuit board that runs Micro Python on the bare metal, and gives you a low-level Python operating system that can be used to control all kinds of electronic projects.
MicroPython is a Python based firmware. MicroPython has both firmware and SDK built into it. It has small but very useful set of APIs built in. I really love Python. Its my primary language. So in the rest of the tutorial I mostly concentrate on MicroPython.
I use MicroPython Firmware/SDK + Dev KitCircuit for Programming mode
To put the ESP8266 in the programming mode we need to connect the pins in the following way
On ESP8266
| VCC | 3.3V - Power supply |
| GND | Ground - Power supply |
| CH_PD | HIGH (3.3V) |
| GPIO0 | LOW (GND) |
Connection between ESP8266 & CP2102
| ESP8266 | CP2102 |
| RX | TX |
| TX | RX |
| GND | GND |
| Vcc | Vcc |
The circuit is simple to build on a breadboard.
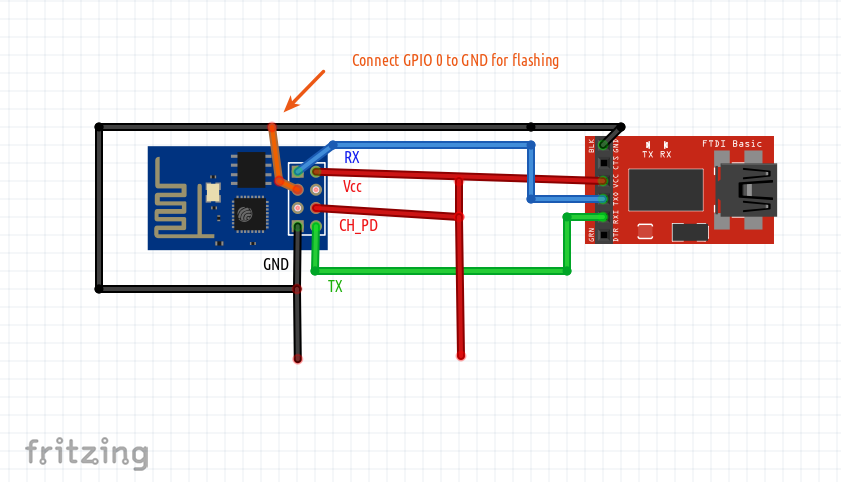
Sometimes it doesn't get into programming mode even if the circuit is built this way. The power off the circuit and power it on, by just disconnecting the battery and connecting back. Remember to connect GPIO 0 to GND. This is what pust ESP8266 into programming mode.
MicroPython Firmware
You can find the extensive documentation on MicroPython website. But I am going to list the simple steps here.
Install MicroPython
- If you are using NodeMCU board then connect to PC. Simple as that. If you are using plain esp8266. Build Circuit for Programming mode as shown above
- Download or build the MicroPython firmware. It will have an extension .bin, for example esp8266_firware.bin
- Once the usb part is connected to the computer. Computer assigns a port name. Get that port name.
- Its generally /dev/ttyUSBS0 on Linux computer but could be different
- Clear the existing firmware
esptool.py --port /dev/ttyUSB0 erase_flash
- then deploy the new firmware using
#for plain esp8266
esptool.py --port /dev/ttyUSB0 --baud 460800 write_flash --flash_size=8m 0 esp8266_firware.bin

#for node mcu
esptool.py --port /dev/ttyUSB0 --baud 460800 write_flash --flash_size=8m -fm dio 0 esp8266_firware.bin
REPL using Serial port
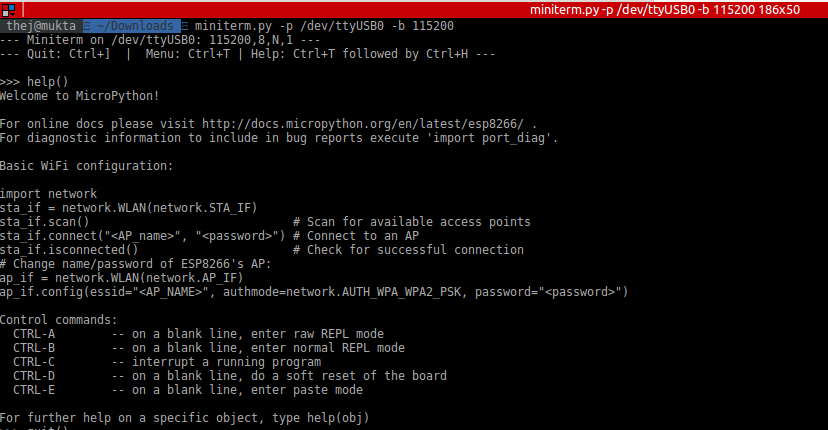
Once you have the firmware on the device you can access the REPL (Python prompt) over USB/UART0. The baudrate is 115200.
miniterm.py is a simple tool to connect to serial port. It comes along with pySerial.
miniterm.py -p /dev/ttyUSB0 -b 115200
miniterm.py -p /dev/ttyUSB0 -b 115200
You can also use other popular tools like Putty.
Web REPL
- If you have downloaded and running the WebREPL locally then open the page http://localhost:9090/webrepl.html in a browser. Else open the page http://micropython.org/webrepl. Its our webREPL client page.
- After a fresh install of firmware. Boot the device.
- It configures itself as a WiFi access point (AP) that you can connect to from your PC. The ESSID Will be of the form MicroPython-xxxxxx where the x’s are replaced with part of the MAC address of your device. The password for the WiFi is micropythoN (note the upper-case N). Connect to its network
- Its IP address will be 192.168.4.1 once you connect to its network.
- Now go to webREPL client page and click on connect
- You should see the Python REPL prompt, indicated by >>>
Write and Run a program
Run a program on boot
Connecting to Internet
This Notebook was last updated on .

 (No Ratings Yet)