Configuring HC-05 using NodeMCU and Performing Transparent Serial Communication
As you know I have been experimenting around Bluetooth. Until now it’s mostly on Bluetooth Low Energy (BLE) which I think is much easier to understand and implement[1 At the application level]. Last few weeks I have been exploring the Classic Bluetooth, specially Serial Port Profile (SPP). This is when I found out the existence of HC-05. Once I found I figured how much popular it is in the maker community. Mostly because of its ease of use.
HC-05 is Bluetooth SPP (Serial Port Protocol) module which gives a transparent wireless connection to an existing serial port. In simple words if you have a wired serial port, you can just connect HC-05 to it and then you can access the port wireless using Bluetooth. Generally makers use it along with Arduino to make its UART wireless.
HC-05 has two modes – Command Mode to configure the module and run mode to run it as a Bluetooth SPP. To get to command mode you need access to its wired RX/TX pins, you can connect to it using any other Device and send commands. In my case I use NodeMCU(ESP8266) to connect to it and send commands through Arduino IDE’s Serial Monitor. The Program is simple. I just took the code from Martyn Currey and modified the pins to work with NodeMCU. Make sure to have installed NodeMCU libraries in the the Ardunio IDE and select the Board NodeMCU. I used NodeMCU because it operates at 3.3v volts which is same as HC-05. If I use Arduino board then I need to add level shifter.

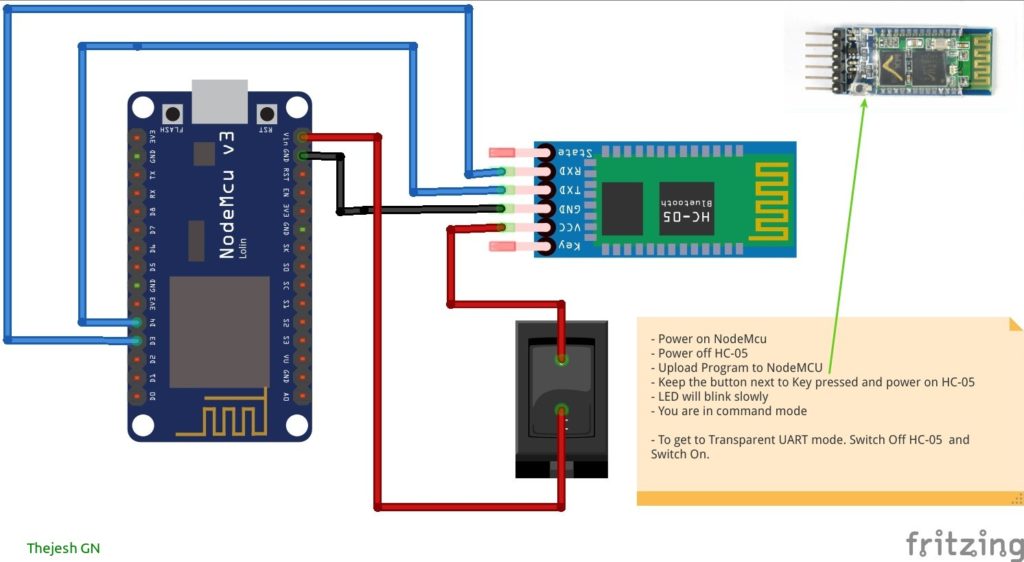
Connecting NodeMCU to HC05
Follow these steps to configure:
- Build Circuit as shown in the image. Remember nmRX-hcTX and nmTX-hcRX crisscross connection between NodeMCU and HC05.
- Power off HC05 and Unpair it if it’s already Bluetooth paired to some phone or device)
- Connect NodeMCU to computer and load the program below using Arduino IDE
- Open Arduino IDE Serial Monitor
- Hold the button pressed and power on the HC05. HC-05 blinks slowly
- Now you are in Command Mode
- Send AT using the Arduino IDE Serial Monitor, it should return OK. Now you are confirmed its in Command mode
- Now you can set parameters like name, baud rate for the device, master1 or slave mode etc
- Once you are done. Power off and power on the HC05. Now it should be in transparent connection mode
To test
- Continue fron where you left. Keep the same circuit. In this circuit the Arduino IDE just forwards the UART communication to the HC05. So anyone connected to HC05 should be able to receive it transparently.
- HC-05 Blinks faster when no one is connected to it
- Install Android App – Serial Bluetooth Terminal
- Search for Bluettoth devices and once you find HC05 connect to it. Default pin is 12342
- Once paired. Open Serial Bluetooth Terminal. Connect to the device.
- HC-05 blinks slower as its connected now
- What ever you send to the HC05, get received by NodeMCU and in turn gets forwarded to Arduino IDE Serial Monitor. Vice versa
- In real life usage it will be just from phone to HC05(Bluetooth)->HC05(Pins)-NodeMCU UART Pins-> NodeMCU. See the second program.
//Program for Command mode
#include <SoftwareSerial.h>

SoftwareSerial BTserial(D4, D3); // RX, TX


const long baudRate = 38400;
char c=' ';
boolean NL = true;

void setup()
{
    Serial.begin(9600);
    Serial.print("Sketch:   ");   Serial.println(__FILE__);
    Serial.print("Uploaded: ");   Serial.println(__DATE__);
    Serial.println(" ");

    BTserial.begin(baudRate);
    Serial.print("BTserial started at "); Serial.println(baudRate);
    Serial.println(" ");
}

void loop()
{

    // Read from the Bluetooth module and send to the Arduino Serial Monitor
    if (BTserial.available())
    {
        c = BTserial.read();
        Serial.write(c);
    }


    // Read from the Serial Monitor and send to the Bluetooth module
    if (Serial.available())
    {
        c = Serial.read();
        BTserial.write(c);

        // Echo the user input to the main window. The ">" character indicates the user entered text.
        if (NL) { Serial.print(">");  NL = false; }
        Serial.write(c);
        if (c==10) { NL = true; }
    }

}

NodeMCU responding back to commands sent over bluetooth SPI
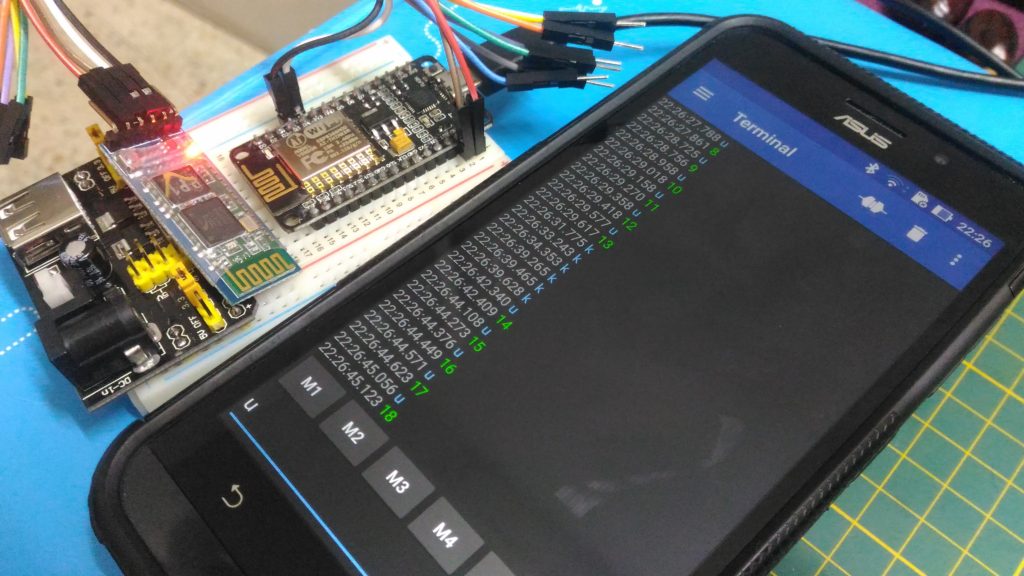
Somewhat real world example. Where when NodeMCU receives character ‘u’ from the Bluetooth SPP in NodeMCU (on pin D4, RX). NodeMCU will increment the counter and send the counter value back. If you send anything else NodeMCU won’t respond. We can use somewhat similar logic to send commands to NodeMCU using Bluetooth App.
- Build same circuit
- Load below program
- Disconnect the NodeMCU from Computer and Connect to a regular power supply
- Power on NodeMCU and HC05
- Connect HC05 using Android App
- Send u and see the counter go up
//Program for simple counter
#include <SoftwareSerial.h>

SoftwareSerial BTserial(D4, D3); // RX, TX
const long baudRate = 38400;
char c=' ';
int counter = 1;
void setup()
{
    BTserial.begin(baudRate);
 }

void loop()
{

    // Read from the Bluetooth module and act on it.
    //For example I can read a sensor and respond with value
    //In this case we just reply with a counter
    if (BTserial.available())
    {
        c = BTserial.read();

         //Do something with C, in our case, print counter if c is u, if not do nothing
        if(c == 'u'){
           delay(10);
          counter  = counter + 1;
          BTserial.println(counter, DEC);
        }

    }

}


