Simple BLE Oximeter App using PHONK
In the past I would have used MIT AppInventor or Expo.io. Both have amazing ecosystems. It’s easy to build apps using them. But this time I wanted to use PHONK. I had used Protocoder before and had liked it. Also I have this idea of building small utility apps called applets (yes!), that I can share with others, easily. According to me PHONK is made for that. It also has an amazing web UI that makes it easy to code without installing anything just like AppInventor but all locally, no internet required. It fit all my requirements.
PHONK is a self-contained creative scripting toolbox for new and old Android devices. Its very useful for writing prototypes and useful small applications.
Thank you Victor Diaz for PHONK. It has great potential and I am going to use it very often.
Now back to our APPLET. Earlier this month I reverse engineered the BLE Oximeter. Since then I wanted to write a simple app to push the data to a web-service. Today I used PHONK to do it. So many things are hard-coded in it. But it works. I will refine it as I go.
The idea is to upload this data to CouchDB whenever there is a variation. Create and send alerts when required. That part is work in progress. I will update the blog.
/*
 *  OXIMETER BLE
 */

ui.addTitle(app.name);
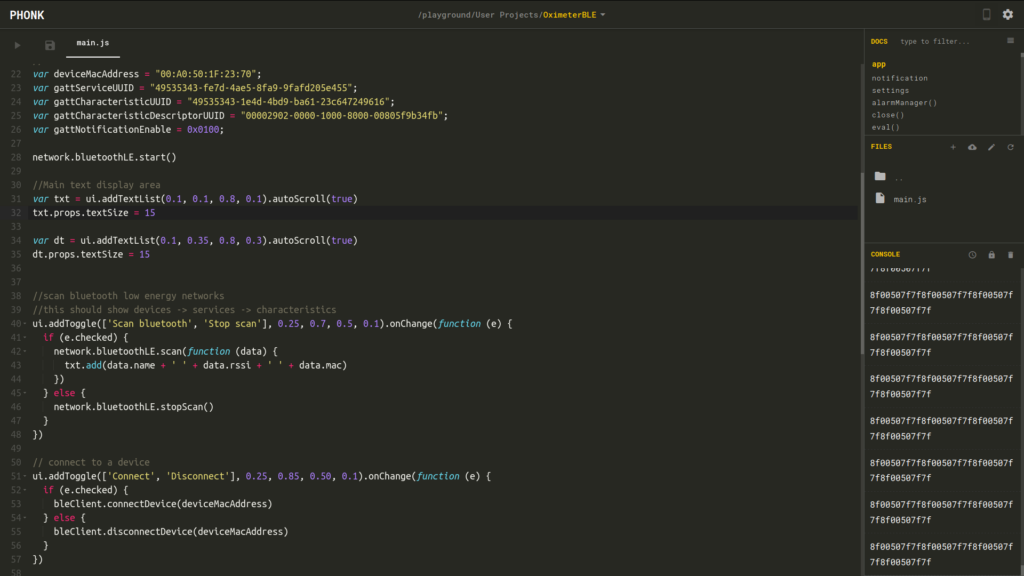
network.bluetoothLE.start();

var bleClient = network.bluetoothLE.createClient();

// -> Write here the BLE device MAC Address
var deviceMacAddress = "00:A0:50:1F:23:70";
var gattServiceUUID = "49535343-fe7d-4ae5-8fa9-9fafd205e455";
var gattCharacteristicUUID = "49535343-1e4d-4bd9-ba61-23c647249616";
var gattCharacteristicDescriptorUUID = "00002902-0000-1000-8000-00805f9b34fb";
var gattNotificationEnable = 0x0100;

network.bluetoothLE.start()

//Main text display area
var txt = ui.addTextList(0.1, 0.1, 0.8, 0.1).autoScroll(true)
txt.props.textSize = 15

var dt = ui.addTextList(0.1, 0.35, 0.8, 0.3).autoScroll(true)
dt.props.textSize = 15


//scan bluetooth low energy networks
//this should show devices -> services -> characteristics
ui.addToggle(['Scan bluetooth', 'Stop scan'], 0.25, 0.7, 0.5, 0.1).onChange(function (e) {
  if (e.checked) {
    network.bluetoothLE.scan(function (data) {
      txt.add(data.name + ' ' + data.rssi + ' ' + data.mac)
    })
  } else {
    network.bluetoothLE.stopScan()
  }
})

// connect to a device
ui.addToggle(['Connect', 'Disconnect'], 0.25, 0.85, 0.50, 0.1).onChange(function (e) {
  if (e.checked) {
    bleClient.connectDevice(deviceMacAddress)
  } else {
    bleClient.disconnectDevice(deviceMacAddress)
  }
})

// enable notification
// var send = ui.addButton('Enable the Notification', 0.7, 0.85, 0.2, 0.1).onClick(function () {
//   bleClient.write(gattNotificationEnable, deviceMacAddress, gattServiceUUID, gattCharacteristicDescriptorUUID)
// })

bleClient.onNewDeviceStatus(function (e) {
  // double check if is the device we want to connect
  if (e.deviceMac === deviceMacAddress && e.status === 'connected') {
    bleClient.readFromCharacteristic(deviceMacAddress, gattServiceUUID, gattCharacteristicUUID)
    txt.add('connected to ' + e.deviceName)
  }
})

//https://stackoverflow.com/a/34310051
function toHexString(byteArray) {
  return Array.from(byteArray, function(byte) {
    return ('0' + (byte & 0xFF).toString(16)).slice(-2);
  }).join('')
}

bleClient.onNewData(function (e) {
  PACKAGE_LEN = 5
  //var value = util.parseBytes(e.value, "string")
  // console.log('(' + e.deviceName + ') ' + e.deviceMac + '/' + e.serviceUUID + '/' + e.characteristicUUID + ' --> ')
  console.log(toHexString(e.value))
  var date  = new Date()
  var v = e.value
  var i,j,temparray,chunk = 5;
  for (i=0,j=v.length; i<j; i+=chunk) {
      packet  = v.slice(i,i+chunk);
      var spo2 = packet[4] //util.parseBytes(packet[4], "uint16")
      var f41pi = (packet[0] & 15) //util.parseBytes( (packet[0] & 15), "uint16")
      var pulseRate = (packet[3] | ((packet[2] & 64) << 1) ) //util.parseBytes((packet[3] | ((packet[2] & 64) << 1) ), "uint16")
      dt.add(toHexString(packet))
      dt.add(" Date = " + date.toISOString())
      dt.add(" SPO2 = "+spo2)
      dt.add(" pulseRate = "+pulseRate)
      dt.add(" f41pi = "+f41pi)
  }

  //dt.add(toHexString(e.value))
})


Hi Thejesh, I used your work to get pulse oximeter data and it’s working. Now I wanted to use Thermometer. But for the thermometer, Indication and Notification is necessary. I got the part with notification in your code. But can you please help me with the Indication? How to turn on the indication?