How to Create and Issue Open Badges
Badges are ubiquitous on the web. Any website that has some social component has badges. Audible gives you badges based on your listening. StackOverFlow gives you badges based on your participation etc. The problem with these badges is that they are not portable and not verifiable. For example, if you are on a site where you want to show or prove the badge that you have acquired on StackOverFlow, then it’s not possible. OpenBadge solves this.
Open Badges is the world’s leading format for digital badges. Open Badges is not a specific product or platform, but a type of digital badge that is verifiable, portable, and packed with information about skills and achievements
Open Badges
If you want to issue Open Badges to your users, You can either use a third-party badge issuer or you can implement yourself. The implementation is not that difficult. The standard is simple and easy to use. But let’s learn by doing.
Table of Contents
Let’s say, as an author of this blog. I want to issue badges to my regular readers. So I need details about the badge issuer (that’s me), a badge, and the association of these two with the badge receiver. These are the minimal requirements. We will use Open Badges v2.0. All badges are hosted badges, as in they are hosted on the web, accessible, and have unique URLs.
All the JSONs below are hosted on github. You can see them in the repo here.
Define the issuer and host it
Here I am, the issuer. So the JSON data defines my details (issuer), and it looks like this. I will also host it on the web at the URL specified by @id. You can visit that URL http://thejeshgn.github.io/openbadge/issuer-organization.json using a browser if you like.
{
    "@context": "https://w3id.org/openbadges/v2",
    "id": "http://thejeshgn.github.io/openbadge/issuer-organization.json",
    "type": "Issuer",
    "name": "Thejesh GN",
    "url": "https://thejeshgn.com"
}
Define a badge and host it.
Here I am defining a badge. A badge that I will give to my readers. It also has an image attached to it and some tags. It has a link to the criteria to earn the badge, which is subscribing to my blog. @id attribute here also hosts this JSON.
{
    "@context": "https://w3id.org/openbadges/v2",
    "id": "https://thejeshgn.github.io/openbadge/reader-badge.json",
    "type": "BadgeClass",
    "name": "Reader",
    "description": "Reader of ThejeshGN.",
    "image": "https://thejeshgn.com/blog/wp-content/uploads/2014/07/thejeshgn_icon.png",
    "criteria": "http://thejeshgn.com/subscribe",
    "tags": ["subscriber", "reader"],
    "alignment": [ ],
    "issuer": "http://thejeshgn.github.io/openbadge/issuer-organization.json"
}
Issue a badge
This is also called Assertion. An Assertion is a representation of issued badge. This is the JSON that does the association between the issuer, badge, and recipient. The @recipient is represented by email, which is hashed using SHA256. You can also add hashing salt; then, the hash is created by sha256(email + salt). It can also be plain text if you prefer that.
{
    "@context": "https://w3id.org/openbadges/v2",
    "type": "Assertion",
    "id": "https://thejeshgn.github.io/openbadge/thejeshgn-reader-badge.json",
    "recipient":
    {
        "type": "email",
        "hashed": true,
        "identity": "sha256$2439c199971e44a07babc5854f5a7fae04028f1c85f492a70bddfa9f55d54130"
    },
    "badge": "https://thejeshgn.github.io/openbadge/reader-badge.json",
    "verification":
    {
        "type": "hosted"
    },
    "issuedOn": "2022-06-17T23:59:59Z",
    "expires": "2030-06-30T23:59:59Z"
}
Here I am awarding it to myself :)
Bake this badge into an image
Since most people would like to use the badge in an image format, it’s also essential to issue it in an image format. The assertion JSON object is embedded inside a PNG or SVG image. I have used an SVG image here.
The simplest way is to add tag inside the SVG and link the hosted assertion JSON. Make sure to use openbadges namespace too.
<svg version="1.1" xmlns="http://www.w3.org/2000/svg" xmlns:xlink="http://www.w3.org/1999/xlink" preserveAspectRatio="xMidYMid meet" viewBox="0 0 640 640" xmlns:openbadges="http://openbadges.org">
    <openbadges:assertion verify="https://thejeshgn.github.io/openbadge/thejeshgn-reader-badge.json"></openbadges:assertion>

<!-- rest of SVG content -->

</svg>
This is called baking the badge. Now my readers can use this image. Here is the baked image. Since SVG is XML. You can use browser’s view source functionality and see the contents.
Validate the Badge
This is required when you are developing the system to issue badges. Once you create the badge, you can validate using validators to ensure it has everything and syntax is correct, etc. You can use an online tool to do this, or you can use a cli.
Let the user use it
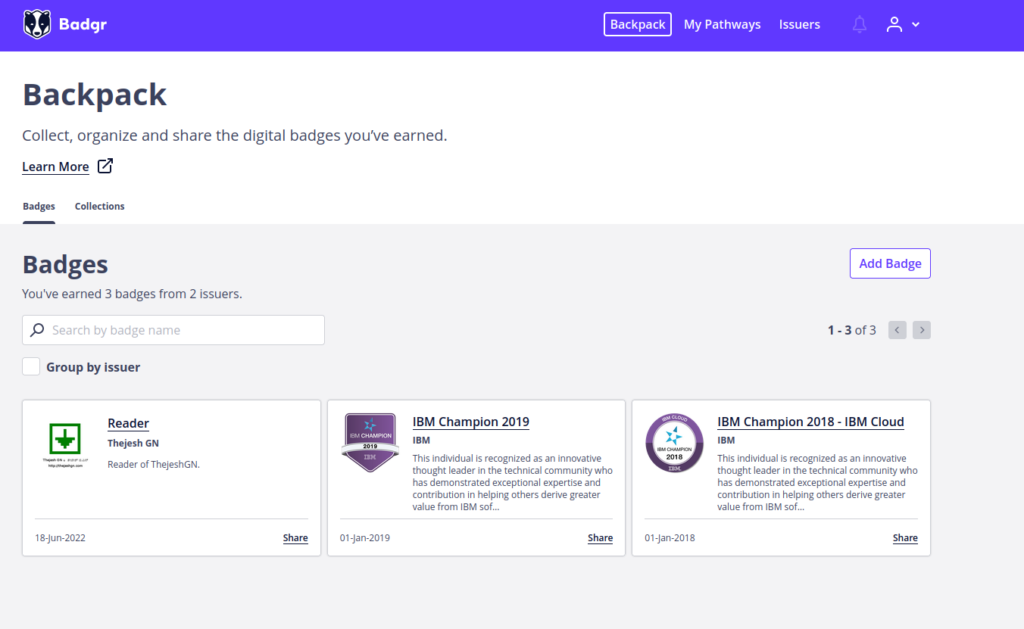
Now it’s ready for the user to use. They can embed the image anywhere they like. They can also embed the assertion JSON if they want. Or they can use third-party badge backups to collect, organize and share the badges they have earned. Badgr.com is one such backup service. Below you can see my backup with two IBM-issued badges and one of mine.
Other Usecases
Open Badges are very generic and versatile. You can use them in any situation where you want to credit users. If you are a blog, you can issue badges like Reader, Subscriber, Donor, Contributor, etc. If you are a restaurant, you can issue badges like Regular, Foodie, etc. You already know how to use them if you are an educational institution. So basically, you are limited by your imagination.
Future
Until now, we have looked into OpenBadges V2.0; There are updates to the protocol OpenBadges V2.1 and OpenBadges 3.0. V2.1 is in the final stages, and 3.0 is still in draft. But some exciting things are introduced in them. We will look at them in the future.


Let’s do this for Sanchaya :)
Yes. You should do it.